Hello everyone!
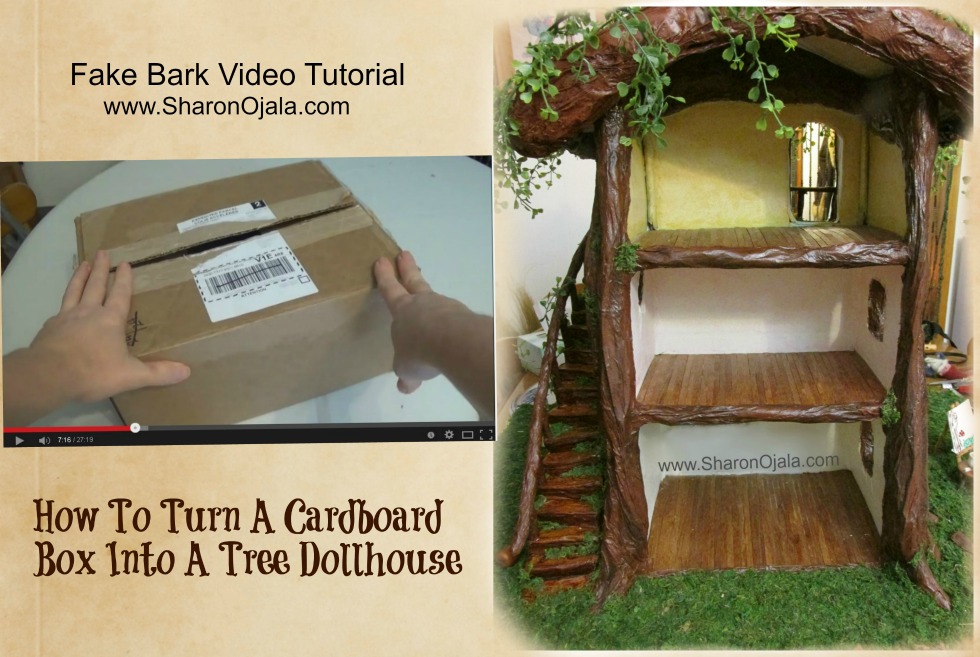
This post gives you a video plus an outline to how I made the fake bark on my two Tree Stump houses pictured below. The one on the left is a wooden dollhouse that I covered in fake bark and the one on the right is a cardboard box that I covered in fake bark. Both are very sturdy and will stand up to regular wear and tear of play.
Update May 2019,
I have a video tutorial showing how to build exterior steps here

Supplies:
cardboard boxes or a large can
cheap foil - do not get the non-stick kind, that will not work
wide masking tape
hot glue
paper towel with no quilted print or pattern on it. Cheap paper towel works best. Do not use 3 ply.
white glue
water
craft paint
Update May 2019: Since this tutorial I have found better ways to paint the bark. Go here, anyone of the videos there shows my new method of painting. It also shows other projects using this bark method.
Video Tutorial:
I do go over briefly each step I took to get the box ready for the bark and also briefly how I did the wooden floors. These steps added time that you might not be interested in. If you'd rather skip all the steps and get right to the bark tutorial then fast forward the video to 12:07
Step one:
prepare the box or can. Cut out windows and doors, paint the interior and add in floors. Glue the house to a base. Any size will do just be sure to make is larger than the house so the tree roots will have something to sit on.
Step two:
add foil to the exterior and shape the foil around all windows and doors, use hot glue to stick it to whatever surface you are applying the foil to. You can skip this step if desired. it depends on how much texture and depth you want.
Step three:
cover the foil completely with masking tape.
Step four:
prepare your paper towel. I tore off a good pile then ripped the pile in 2 to make them an easier size to work with.
Step five:
prepare the glue and water in a large bowl. Mix the 2 until you have the consistency of pancake batter. You don't want it too runny and you don't want it too thick. You can use flour and water but I prefer glue and water. I don't like the finish of the flour and water when it's dry.
Step six:
take a piece of paper towel and run it over top the glue and water, one side will be wet. Fold the towel in half, dry sides together and then pull the excess glue and water off. This step will saturate both sides of the paper. Unfold the paper and drape it over the surface you want to cover. Make wrinkles in the paper as you lay it and make sure to work out all air bubbles and also over lap the edges. Do this step over and over until the surface is covered. Let the house completely dry over night or if it's a sunny day let it dry outside. If you used cheap paper towel then most likely a good amount of glue will pool at the bottom as it dries. You should have something to catch this excess such as wax paper.
Step seven:
paint the bark in the color of your choice. Let dry. One solid color will not look good so add highlights with a lighter paint and shadow in the crevices with a darker paint.
If you use a brown you can cover the surface after it's painted with a minwax stain. A stain will fill in all areas that paint will miss. If you use stain then make sure to follow the directions and also seal the stain in with a matte sealer. I used a spray on acrylic matte sealer and that worked just fine. You can add paint after the sealer is on as well.
Bark color takes some work. If you don't like what you see just wait for it to dry and try another paint.
Step eight:
Decorate with fake vines or flowers and enjoy your new home!
Oh thank you so much for sharing your talent, I am making trinkets (wizard and fairy items) to go into these homes... LOL I'm a granny and 2 grandsons, with 3 more babies due this year... so I will be busy... once again, thank you and keep up the awesome work!
ReplyDeleteI recently discovered your fake bark tutorial and your tree dollhouses on Pinterest, and I'm in the process of making a fairy treehouse for my granddaughters. Thank you so much for taking the time to do all these tutorials! They are really great!
ReplyDeleteInspired by your creativity, and the YouTube videos, I made my own tree as well. (I'll probably post the photos in my blog this week). Yours is definitely superior to mine... (I found the roots to be the most difficult to shape just right)... but for my first one I was happy with the result. It is a pretty messy process though, so I doubt I'll ever make another one. Lol! LOVE your blog by the way.
ReplyDeleteI am really inspired by your tree stump and cardboard house. How did you make the balcony and stairs?
ReplyDeleteI'm planning another project and in that I will include the balcony and stairs in the video. I don't know the date but I'm trying to do it asap
DeleteThe stairs are folded tinfoil pieces that I hot glued together done in small sections at a time, fitting each section to the shape of the wall, then covered in the same bark technique.
The balcony is a piece of cardboard, the top covered in coffee sticks, the bottom covered in tinfoil to build it up and also to fit it to the shape of the wall. Did all the bark and the staining first then hotglued it to the wall. Added some strength with the branches under it.
WOW great Idea! Sharon I would never have thought of using the foil for stairs I would probably use folded cardboard or foam. I have used a lot of foam in my village landscapes for stairs, mountains and bases!
DeleteSharon - Have you ever tried Styrofoam - it can be cut with Foam hot wire tools and can be done in about and hour as opposed to several days. Jerry
ReplyDeleteno, I've never tried that... I've never worked with Styrofoam before. Good idea though :)
DeleteThank you so much for the bark it will be perfect for my woodland house.
ReplyDeleteHi Sharon!
ReplyDeleteI have been perusing your floor makings here and I cant see what your method is in attaching the actual flooring to the dollhouse,
I may have missed it, happens to me quite a bit (must be that lets get it happening thing!) just wondering what your method is!
I'm a bit stumped lol pardon the pun.
I have been making a small mouse house with cardboard and paper mache' in a stump just for FUN! I am enjoying the paper, glue messings lol I love the idea of paper Mache" looks great and costings are minimal.. that's what I like and you have fun all the way!
Hi Deni :) I answered this morning on the other post, maybe you missed that. But maybe I misunderstood your question. Do you mean the hardwood flooring made with coffee sticks or do you mean how to put the floor into place?
DeleteAre you on facebook? I answered the one question there and if you are on fb then I can give you the link to that post that also has a photo too...
sorry I have been having some problems with mail delivery from you site not sure why
Deletethis is what I am getting back
Delivery to the following recipient failed permanently:
groupsandgames@hotmail.co.uk
I have now got you coming into my mail that will help I'm sure
to put the floor in place is what I was asking about lol
thank you Sharon! I do hope you havent got my comments twice cause when it kicks back I resend I wont do that now!
Finally, a step by step process to making a fairy or gnome house. I'm so glad you posted all of these videos. I'm enjoying them immensely! You are very, very talented.
ReplyDeleteI'm guessing this is for indoor display only? Any suggestions if I want to make one that can be put outside?
ReplyDeleteyou would have to seal it with an exterior sealer. For that I would talk to a professional at your local hardware store. They will know what to use.
ReplyDelete