
Hi everyone!
Welcome back to my blog. Today I'm going to show you some new dishes I got and also show how I decorated the miniature hutch. This is the same hutch I recently did a tutorial for. If you're interested in making one the tutorial is here.
A trick to holding tiny things on a shelf,
Before we get started, I used a candle adhesive to hold all the tiny things on the shelves. I tried it without the adhesive first and with one tiny bump into the hutch all came tumbling down! Frustrating.
The candle adhesive is like a sticky wax that can be washed off with hot soapy water. I think it's better than gluing things on the shelves permanently. It's a nice option for those of us that like to change things around now and then.
I found a tin of it in the thrift store but I did a search on Amazon and you can buy it there. I have no idea if you can get it in craft stores or not.

I bought the dishes on Amazon.ca for 8.99 Canadian with free shipping and the silverware for 2.94, also free shipping. I ordered on the 27th of May and they arrived June 12th.
I will link you the the ones I bought (this is in Canada, they might direct you to your country's Amazon site when you click the links).
I do not get a commission for any sales. I want you to look around for other options as well, make sure you are getting what you want before buying!
The dishes come with different pictures on them.
The silverware was free shipping for 1 set but they would charge shipping for any added on silverware sets so I ended up buying another set from another buyer so I could get free shipping on both sets.
link 1) Silverware
link 2) Dishes: when I checked just now it says the particular dishes I bought are now sold out so I've linked you to a different color., be sure to check out other dish sets as well.
The Video and the How To,
In this video I unbox my new mini dishes and silverware. I also show you how to make the miniature candle holders and a couple other goodies you see on the shelves. See the video's description box on youtube for timestamps. I hope you enjoy!
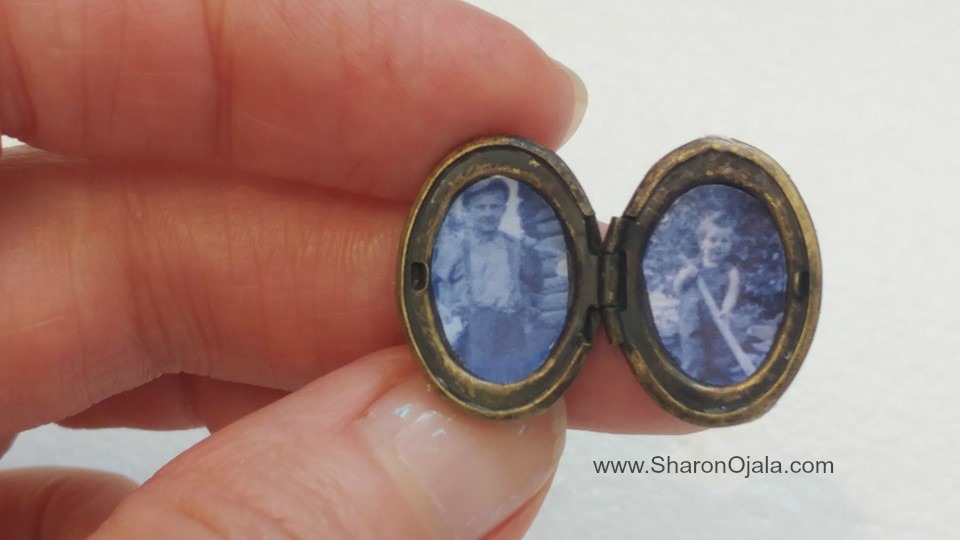
My locket turned picture frame,
I found a locket in a thrift store and it was exactly what I was looking for. I had pictured this before I found it! I have 2 special pictures, my father when he was 10 yrs old and my mother at 3 yrs old. I so wanted to include these pictures on the hutch so it was a joy to make that happen! My parents are now 86 and 74.

Resizing photos to get mini size,
I went about shrinking these pictures first by reducing the size by 50% using Paint. Then I saved them to my computer and reopened the new size using Windows Photo Gallery, clicked on print and chose "contact sheet".
I said in the video I used wallet size but that is wrong, I used contact sheet and made sure to unclick the little box that says "fit picture to frame".
This method of resizing works okay for me, I've had success, but there are better ways to resize your photos. I would highly suggest searching google for instructions.
Goodies on the shelf,
- I show in detail how to make the antique candle holders using the cardboard from a cereal box.
- I actually made the mini book years ago by cutting a segment from the spine of a magazine then gluing a piece of real book canvas as the cover.
- The stack of letters are strips of coffee stained paper folded into envelops. I scribbled on the fronts with pen, added a stamp using colored paper (actually pieces from old, used stamps) then tied them up using twine. I had to untwist the twine because it was too thick and used one of the strands from that.
- The Gnome picture is an image I found online, resized and printed off. I glued thicker paper to the back and roughed up the edges to make it look old.

Comments
Post a Comment