Page Updated May 2019,
I started this dollhouse to tree stump renovation in July of 2014. I was learning as I went along and made mistakes but each mistake taught me a lot!
I did video updates on this blog as I did each step and those were posted over a period of 2 months. Today I decided to put everything I can onto this one page. This will make it so much easier to find the diaries and reduce the number of posts you would have to go through. The video diary links are at the bottom.
Here we go!
I first got the little wooden house in 2012. I cleaned and painted it. My kids enjoyed it for a long time. Then I noticed it was no longer being played with so I claimed it for my Gnome!

A brief rundown of the start of my renovation:
- Stripped all windows, frames, and removed the roof
- Reshaped all windows, interior walls, and exterior walls
- Added new roof with extensions on both ends
- Put in wooden floor
Fake Bark:
Once I stripped it, I built it back up with foil and glue and covered it with burlap (I no longer use burlap under the bark) then with newspaper that was soaked in glue and water. I cover the the newspaper in paper towels dipped in glue to create the bark texture
I gathered up a few of my fake bark tutorials for you all found on one page here.
Floors:
I glued down coffee stir sticks for floors and stained them with instant coffee.
I have a wooden floor tutorial here

Bad shingling and paint job,
I shingled the roof with cedar and did a terrible job. I had no idea how to shingle a roof. Now I understand that you actually start at the bottom and stagger them but live and learn!
I also painted the bark brown. I really yucky brown and it stayed that way until I started playing around with highlighting. It got better in time.
Fake stones made from paper,
By the time I got to Part 5 of the renovation I found out how to make fake stones using paper cup trays. I don't know who first came up with that idea but it's brilliant!
See my fake stone tutorial here.

Make the yucky brown stop!
Okay, okay.. I did like that yucky brown at first but then I was like, this is gross. So I played around with paint and finally got better! Yay for all of us! 😃
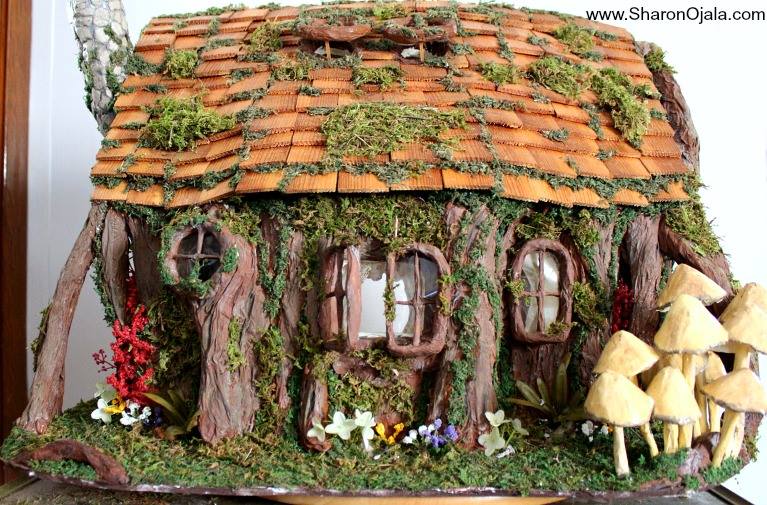
The mushrooms,
This is how I first started building mushrooms back in 2014. I got better over time but I remember being so happy that I even made any using just foil, tape and paper. The ones you see in the picture above are called Inky Cap Mushrooms. I ended up doing a video for them here
Video Diaries of the Stump House Reno,
All of the video diaries I did during the renovation were uploaded to my first youtube channel that I now use for only crochet toys tutorials.
Since this renovation I started a new youtube channel called Where The Gnomes Live and there I have 5 more video updates for this house (see bottom of page for the playlist, it starts with one update and will play the next when done).
The house took on a life of its own in 2016 and ended up being the house you see below.
Video Updates July 2014 to August 2014
- Diary Part 1 here
- Diary Part 2 here
- Diary Part 3 here
- Diary Part 4 here
- Diary Part 5 here
- Diary Part 6 here
You can see the start of that HUGE renovation blogged here.


Loved it and can't wait to see how you finish it!!
ReplyDeleteBarb
almost ready to wrap up part 4.. tomorrow or the next day *fingers crossed*
DeleteDe momento has realizado un gran trabajo .Lo bonito vendrá luego.
ReplyDeletethanks so much :)
DeleteIt's so fascinating watching this dollhouse evolve. Do you have plans for a family to live in it? Maybe some mice? or little gnomes?
ReplyDeleteThanks Linda! And yes, I do have the occupants already planned out. They will be something very special and meaningful to me * I don't want to spill the beans yet on who or what ;) I'm hoping to wrap up the house part soon and get to making them
DeleteI love your enthusiasm! Can't wait to see it finished.
ReplyDeletethanks!!
DeleteThe bark houses look so realistic. Thank you for sharing your technique. How did you make the balcony and steps on the fairy/gnome house?
ReplyDeleteI used the same methods I used on the house. The balcony is cardboard cut to fit then covered in bark on the bottom and the floor part same as in the house. The steps are tin foil pieces hot glued together. I made the steps in sections. I'm hoping to do a how to video one day soon
Delete